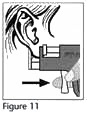
2. Keeping the proper alignment, continue to squeeze the trigger until it releases the plunger. In less than 1/10 of a second, the ear will be pierced and the clasp will be automaticallly installed on the stud with the proper spacing (Figure 11).
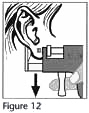
3. Release the trigger and carefully pull the Instrument straight down from the ear (Figure 12).
4. Repeat this procedure for additional ear piercings.
After piercing is complete, wipe the pierced area of the ear (front and back) with a cotton ball saturated with MediSept Ear Care Solution. Apply MediSept Ear Care Gel to the front and back of each piercing. Give the customer after-piercing care instructions to take home with them.
NOTE: After you are finished piercing, ask the customer if they are able to stand up, or if they need a few minutes. If the customer stands up and feels dizzy, help them sit down, and have them wait 3 to 5 minutes before leaving.
CARTILAGE PIERCING-
If you are piercing in the cartilage area of the ear (see fig.13), special care must be taken during both the piercing and the after-piercing care.
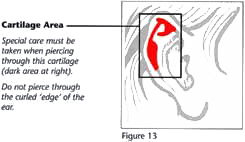
With customers who have very thick or heavily curled cartilage, you must pull the cartilage slightly to "unroll" it when piercing the cartilage around edge of the ear. This is to ensure that the piercing instrument can be properly positioned. Whenever piercing through any cartilage area of the ear, you must take care to ensure the instrument is held prependicular to the surface of the ear. Alert your client that the healing of the cartilage area will take somewhat longer than the lobe area.